Introduction[]
One of the ways to increase visual quality in a game beyond “stock” options is so called downsampling. It means that you render the scene in a greater resolution than is your target resolution (conventionally full HD 1920x1080 res). It’s also a good way to utilize your immense processing power while playing older games.
It’s particularly useful when the game engine doesn’t support anti-aliasing; you can emulate AA simply by rendering the scene in a bigger resolution, then downsample it to the target resolution using an appropriate filter. So let’s say you are able to render games in 2160p resolution on 1080p monitor, that’s like a 4x Full Scene AA for you right there. Also it’s usually better than forcing or injecting AA, since such options can cause glitches, or are just non-existent for your game.
This technique also saves the day when your shot is a little bit off your desired direction, or you captured something you didn’t want to be in the final picture, or you realize afterwards the subject is further away as you wanted. In that case, you can crop out your picture all the way up to the target resolution (unless you wanted to use the extra resolution for AA, obviously).
Disclaimer[]
I didn’t find that any of the following procedures have a potential to damage the hardware; neither did hear of any such case. However everything you do with your hardware or software you do on your own risk, I can’t guarantee that nothing bad will ever happen while trying this (although it probably won’t).
I tried it only on Windows 7 x64. On Vista there was an issue reported, but fixable by reinstalling GPU driver. I don’t know about XP since it’s quite obsolete now.
You should always use the latest software and drivers. Update GPU drivers before proceeding, if you haven’t do so recently.
And probably you shouldn’t have monitor connected with the old analog D-SUB cable (a.k.a. VGA – the blue one). With DVI (white) this works just fine.
How to[]
This guide assumes you want to achieve the resolution 3840x2160 on a full HD screen (1920x1080), but it contains all the information necessary to set any other resolution you want (within your hardware’s resources). It is divided into several steps, after taking which you should succeed. However, everything depends on the combination of your hardware (monitor + GPU), and if you are lucky enough you maybe won’t need to get through all of them. You can also stop at any point and happily use the highest resolution you achieved so far, it’s up to you.
Note that later in the guide there are screenshots included that I gathered around the Internet with examples of configurations that are working on different machines. You can skip right to them if you know what you are doing, but otherwise I would not recommend skipping previous parts of the guide (you may get for example a black screen while wouldn’t know why and you will be very unhappy).
Custom resolution[]
Alternative guide by wasteomind: http://forums.guru3d.com/showthread.php?t=346325
These are the basics which let you set a greater resolution without much effort, but probably not 2160p yet. Everything will be done in NVIDIA Control Panel.? Open it up by right clicking on desktop or from Control Panel in Windows.
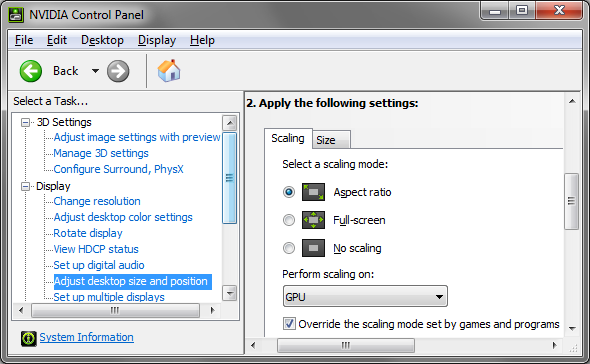
Adjust desktop size and position[]
Set the scaling options as in the picture below. This is how we want our display to behave, however changing these settings didn’t make any difference for me. But it’s necessary when your display does not support scaling.
Scaling Options
fqaweQwef(JKmoqawlfAwfs[]
sef
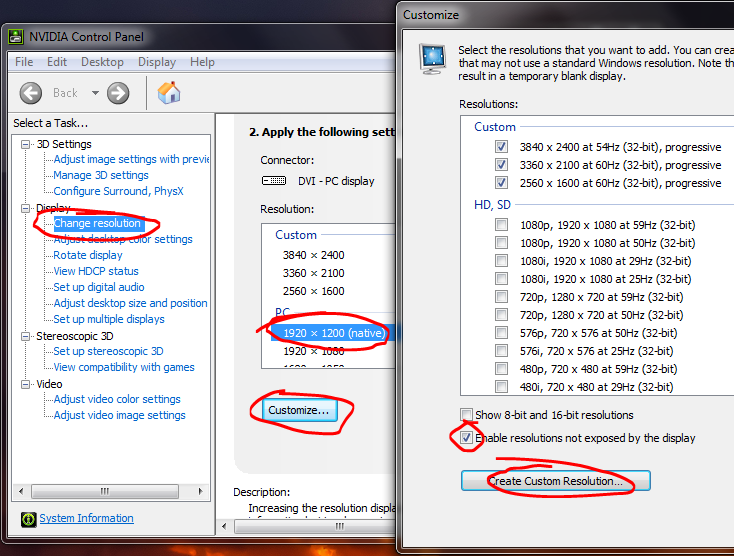
Create Custom Resolution
What you will see here by default are just “normal” resolution settings, Horizontal pixels and Vertical lines represent the final resolution in which the image will be rendered, and also Refresh rate which speaks for itself, nothing new. Don’t change Color depth; you always want to have it at max value. Also don’t change Scan type.
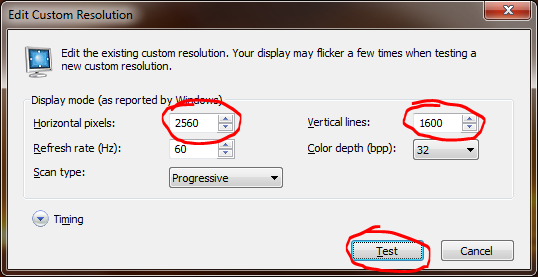
Edit Custom Resolution
At first, try if you could set 3840x2160 right off, and hit Test.
Now 3 things can happen here:
Anytime when the test succeeded, you can hit yes and after that you can pick your resolution normally from menus just like any other standard res.
In the picture Edit Custom Resolution I tried the next standard resolution (note that I have a 16:10 screen and that’s about how far I can go without changing anything else, but you can always test any custom resolution. To preserve your displays aspect ratio, you need to calculate the Vertical value by dividing Horizontal value by 16 and the result multiply by 9 or 10 according to your display’s aspect ratio.? For example, you want to test resolution 2700xXYZ, and you have a 16:9 screen. Then you do this: 2700/16*9=1518.75, so after rounding the result, you have to set 1519 as a Vertical value. I would recommend here using only multiples of 16, so for example 2704, to get precisely 16:9 ratio, although it’s not absolutely necessary.
Anyway, don’t waste too much time finding the greatest resolution now, just try your target one (2160p) and if it doesn’t work, move on to next step.
Timings[]
Click on the arrow in the bottom left, to open up the Timing options, and select Standard: Manual. I will now describe what I learned about the settings here, but what will really interest us, is only Total pixels and Pixel clock, and how to set that properly is described later.
Active pixels
Total actual amount of you monitors pixels (native res.) Determines how many pixels will be displaying the picture – don’t change this; you always want all of them.
Front porch / Sync width
Something about how the picture is synchronized (apparently). You could try to play around a little with this however it didn’t yield any positive or negative results for me.
Total pixels
These are total pixels that are transmitted to the monitor, it always must be a greater number than Active pixels; it’s because how a screen is refreshed (actually it goes “out of bounds”).
Polarity
Determines which signal polarity is used to synchronize the picture in respective direction. Again, no need to change it, it doesn’t matter (in single-monitor systems).
Vertical refresh rate
Let’s you change refresh rate by tiny steps. Didn’t find out how to get use of it, you might as well change it at the top of the window along with the resolution by 1 Hz.
Pixel clock
At what frequency the information is transferred over a cable to the monitor.
Setting the best Total pixels values[]
This is quite tricky, but I found that usually the best values are the lowest ones. I played around with these by trying greater settings and I was able to slightly raise resolution by few hundreds of pixels, but nothing significant, since it still wasn’t 2160p. I don’t understand and didn’t find anywhere how exactly this is supposed to work, but again, the lowest values generally work out the best.
At first start from a resolution that you know that works, but change it by 1 pixel, so NVIDIA CP doesn’t give an error that you already have this resolution saved (i.e. 1921x1080) and hit Test. After every successful test, lower Total pixels values, one at a time, by a small number – I would say by 10 at first, then by 5, and at last by 2 or even 1 (you will probably stop around 2000x1100 or x1210 for 16:10 screen, check Examples for the reference). Don’t save the new resolution when asked, just hit ESC (or click No) and continue.
You will know you reached the lowest threshold when your screen will go black and won’t show after a few seconds – hit ESC and go one step back. Note that you can’t go much lower than the minimal working values, because your screen won’t restore even after pressing ESC key; you will need to restart your computer (this happened to me, don’t worry it doesn’t cause any permanent hardware damage or even need for GPU driver reinstall, just reboot PC).
The picture may become glitched at the edges of the screen, or blurry or overbright when using too low Total pixels values, even before you reach the not working threshold. If you notice such a bad image quality, try raising these values a bit. For example I could go as low as 1205 Vertical Total pixels before the screen goes black, but I get a 5 px thick glitched bar at the bottom of a screen, so I stopped at 1210 for a Vertical Total pixels.
Lowering the Refresh rate[]
Probably you won’t be able to get 2160p at 60 Hz, but that’s okay. Now start lowering Refresh rate by 1 Hz at a time and testing. After test succeeded hit yes to save, and there you got 2160p! However, you may not be done yet. Try if your custom resolution is recognized by Windows by setting it as a desktop resolution or in any game. If not, continue to the next step.
Every monitor has a minimum threshold for refresh rate too, and you will get also a black screen after exceeding it. If you cross that value sooner than achieved 2160p I would advise trying larger Total pixels values, if the lowest doesn’t work for you. But here you can’t let Pixel clock go over 165 MHz. Over this value the DVI cable communication switches to the dual-link mode, and even if you have a dual-link DVI cable, you will get shuttered image because your monitor doesn’t support it (unless you have a 120 Hz one – but if so, you wouldn’t even get this far in the guide).
Examples[]
You can try these configurations (tested and working on various PCs), but note that it’s very individual and hardware dependent, so it may not work for you and you will need to find yours config by yourself, as described previously.
")
")
")
")
")
")
")
Hacking EDID[]
Alternative video guide by Dango: http://www.oc-burner.de/ftp/Videos/Downsampling/EDID/EDID.html
If you must lower the refresh rate too much in order to get 2160p working, your custom resolution may not be recognized by Windows. It is because your monitor driver restricts refresh rates (in EDID) even such that monitor is still physically capable to use. So obviously we are here to enable them; we will need 2 tools for that.
Phoenix EDID Designer[]
Download Phoenix EDID Designer: http://www.tucows.com/preview/329441 (WARNING: AdWare/Malware)
Mirror here: http://www.komeil.com/download/2924
Open Phoenix. Go to Tools –> Extract Registry EDID. If you see several entries here, just ignore those with “Generic” in description, those are drivers for virtual generic devices. You are looking for entry with yours monitor manufacturer in Manufacturer field and model name in Description. Click there and then hit Extract EDID as shown in the picture below.

Extracting EDID
Now you loaded whole default driver configuration for your monitor. You can do this anytime, even when you are already running on hacked EDID – although you still should save your default config now in File -> Save EDID.
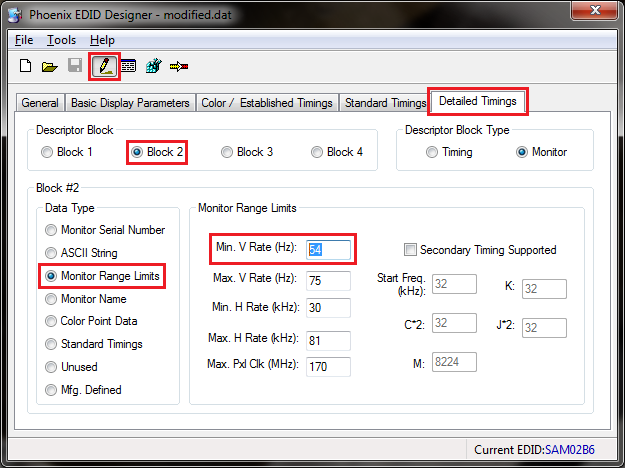
Enable editing mode by unchecking in File -> Read Only and go to Detailed Timings. Now what interest us here are blocks 2-4. They are the same but with different values, and probably only one is “active”. You need to find that one that is significant for you, by checking values in Data Type -> Monitor Range Limits. You are looking for data that seems about right for your monitor, i.e. vertical refresh rate 56-75 Hz, horizontal rate 30-81 kHz (if you are not sure you could check it in specs). Also, I had in other two blocks by default Max Pixel Clock value 0, what gave an error when entering config for that block, so that could be your clue as well (that you are in the wrong block). Also, you can set all 3 blocks to be the same to be sure.
Modifying EDID
As you can see in the picture here, mine active block is the block 2 and I just changed minimal vertical rate from default 56 Hz to my custom 54 Hz. So do the same accordingly to your custom resolution refresh rate, and save modified EDID.
Monitor Asset Manager (MonInfo)
Download Monitor Asset Manager: http://majorgeeks.com/Monitor_Asset_Manager_d1991.html
Open MonInfo. Load your custom EDID in File -> Open. You can check here if you did right the timing editing; locate line Vertical scan range...... in Asset Information. It should show your modified values e.g. 54-75Hz. If it shows different values you did something wrong in previous step, so try again.
Now export all this to a driver file in File -> Create INF.
Updating the monitor driver[]
Go to Control Panel -> Administrative Tools -> Computer Management -> Device Manager -> Monitors. Right click on your monitor and select Update Driver Software -> Browse… -> Let me pick… -> Have Disk… -> Browse… and point to your custom saved INF file you just saved. Hit OK -> Next -> Install anyway. You may need to reboot your computer and you are done! Test if you can select 2160p as a desktop resolution, if so, you will be able to select it in games as well.
Known bugs and issues[]
Game crashing[]
Using build-in AntiAliasing or VSync in game may result in crashing the game to desktop while using custom resolution or custom refresh rates. In that case use NVIDIA control panel to force desired AA and VSync options.
Higher input lag[]
You might experience a higher mouse or any other input lag when using downsampling. Try disabling VSync in that case. It may not work exactly right when using a custom refresh rate, and takes vast amount of resources.
Other options to consider here are (in NVIDIA CP) Adjust desktop size and position -> Perform scaling on, and Manage 3D settings -> Maximum pre-rendered frames.
References[]
[1] Downsampling: How to, http://forums.guru3d.com/showthread.php?t=346325
[2] HOWTO: Downsampling (custom res. 2100 x 1314 - 3840 x 2400) in DX9 / DX10 / DX11 with NVidia..., http://www.overclock.net/t/1237470/howto-downsampling-custom-res-2100-x-1314-3840-x-2400-in-dx9-dx10-dx11-with-nvidia-cards-directly-selectable-in-the-game
[3] How to Force DVI or HDMI Resolutions and Refresh Rates in Windows 7, http://www.sevenforums.com/tutorials/7947-force-dvi-hdmi-resolutions-refresh-rates.html
[4] Original locations of pictures with Custom Resolution configs: Example 2, Example 3, Example 4, Example 5, Example 6.
Further reading and tools[]
[1] 2160p rendering (downsampling), http://www.flickr.com/groups/deadendthrills/discuss/72157631666519316/
[2] Downsampling mit AMD (in German), http://www.forum-3dcenter.org/vbulletin/showpost.php?p=9282115&postcount=5099
[3] Skyrim - Unstretched Windowed Fullscreen Mode by _DTG_, http://skyrim.nexusmods.com/mods/7347? (Illustrated quick guide for SRWE: www.mediafire.com/download.php?54ic55fyk5vk6jc)
[3] * SoftTH v2.08b alpha test version *, http://www.kegetys.fi/forum/index.php?topic=2123.0 (reference: http://forums.guru3d.com/showpost.php?p=4446318&postcount=158)